Mission Accomplished : Baby Girl’s Curtain
I last left off with a half-finished curtain and a nap-in progress. See HERE if you want to see the beginnings…
After nap and snacks and some chores, I finished it up.
First, I folded over the sides of the curtain fabric and stitched a straight stitch the whole way up, really really close to the edge. Then, I folded that over and I stitched it again, from the front so that the stitches would look clean and it wouldn’t fray. (I hemmed it…)
I did the same on the bottom of the curtain piece.
Then, I turned the top, finished piece, over so that the front was on the floor. I placed the large curtain piece face down as well, lining it up with almost the top of the topper. I put the one side that I hadn’t hemmed up (in case that wasn’t obvious.)
I pinned it all the way across so that it wouldn’t get away from me again. It didn’t.
I stitched along a lightly colored line in the stripe, which hid the thread nicely. I used a simple straight stitch. Honestly, that is almost all I ever use. Seriously, I need someone to teach me how to use this machine!
I sat down with the finished product and some tiny scissors for a while, and trimmed all of the little stray threads and whatnot. Once it was cleaned up, I had to figure out how I would mount it.
I had already applied some Danish Oil to the curtain rod that I mentioned in the last post, but I was starting to stress about how I would mount it. Another concern struck me… The main reason that I wanted a curtain was because light was coming in AROUND my ROOM DARKENING SHADES. They aren’t all that darkening when there are gaps that shine lines across the room. I mean, they help, but I’m looking for BLACKOUT! So… if I hung a curtain rod that would stick out, the light would simply come out around the curtain. Bummer! When I went into the garage to see how the rod looked, it struck me… I had purchased some wood trim a while back; the wrong wood trim, mind you, for the previous project; and it was sitting on a shelf.
I cut the trim 1 1/2 inches longer than the window gap in the wall. I figured this would allow me enough space to be able to nail in the trim piece without hitting the metal framing around our windows. We ran into that problem in our Master Bedroom. Anyway… I applied some Danish Oil, did the wipe down, got two finish nails started in the ends and then went running upstairs. That’s right… I didn’t even let it cure. Shhhhh!
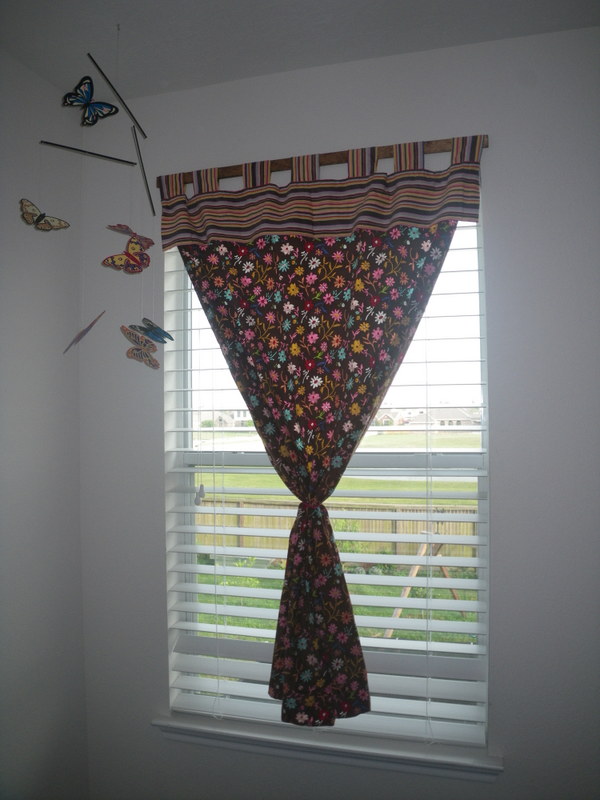
I stood on a step stool on the mattress that is on the floor for our little guy… not the safest perch, but I did make sure kids weren’t in my fall zone. I fed the “rod” through the loops on my curtain and then held it up and centered it over the window. I nailed it in and then slid the farthest out loops over as far outward as possible. It just looked nicer than having wood sticking out past them…

I am THRILLED with how it looks! My husband loves the curtain, but not my mounting technique. His
concern is that the curtain isn’t moveable, and the window can’t be fully opened to let in the view and the light. The plus side is… that was kind of the point. One day, girly will want the view and the light at her disposal, but as long as I’m co-sleeping with two light sleepers, this is the best solution.
I grabbed one of my daughter’s little hair ties and gave it a little more flare to show my Hubby. It’s funny… I wasn’t sold on the colors on these fabrics, but they match the mobile that our daughter got as a baby gift perfectly!!! Hooray! Mission Accomplished!