Work in Progress : Curtain for Baby Girl
I’ve never made curtains before. This is a very exciting project. It’s also a big challenge because I’m trying to pinch pennies and I’ve got to use what I have. A while back, my husband went fabric shopping for me. He knows that I create best when I have a stash at home and don’t have to add shopping to the task list. He came home with an interesting assortment. I’m still looking for ways to use most of it. And I’m grateful for that challenge.
I finally decided that the curtain HAD to be made for our little girl’s room. It is the room where I sleep, with the kids, and our son has begun to point out the lights moving as cars go down the street, or the lines from the street light. We certainly aren’t in the “city” city or a super high traffic area, in my opinion, but there is a street light not far from our backyard and it certainly lights up the night. We light that from a security standpoint, but not so much from a sleep standpoint.
Anyway…. I dug right in. First, I measured the window that I wanted to make the curtain for. I went into the garage and found a cut of a clothes rod that was left over after I re-did the rod in our downstairs closet. I did a Google Image Search for handmade curtains and basically just looked through to find ideas for the design. I decided that I would do loops of fabric at the top to hold it to the rod. This will mean that I have to eventually sand and stain and “pretty up” the rod, but I’m okay with that.
I decided on 4 inch striped loops (before hemming…). I decided to run the lines vertically so that my seams would be mostly hidden, or at least blend in. I folded over the fabric “two squares” on the guide on the machine.
I had cut the 4 inch wide strips long enough to go around the rod and leave me lots of room. I made more than I thought I would use. This way, I wouldn’t have to stress if I decided I wanted more.
I determined how long I would want the top strip of the curtain to be and cut it, with lines going horizontally, so that it would be about 16 inches tall / 8 once folded, I think. The width was all planned out, until I realized that the fabric that I had for the lower part of the curtain wasn’t wide enough to meet my “plan.” So… the top ended up being cut to match the fabric that I had, at it’s widest. Make sense? I’ll take some final measurements once I’m all done, I promise.
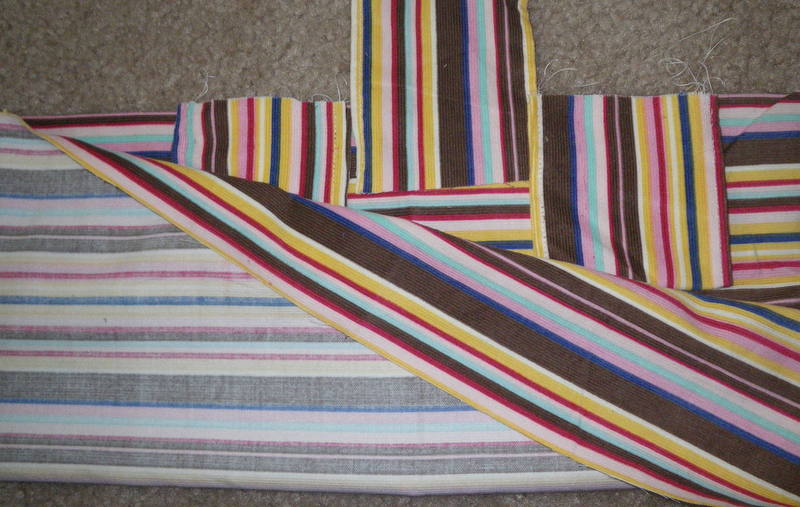
I laid the big strip out in front of me, pattern up, and laid out my “loops” to see how I wanted them spaced. The easiest for me ended up being one loop sewn, one loop space, one loop sewn… No measuring required. To secure them to the top portion of the curtain, I folded the loop fabric in half, pattern side out, and lined it up with the top of the big piece (pattern side up) in front of me, where I wanted it to end up. Then, I folded the long piece up and over it, and secured with a pin. The photo might be clearer than my description:

One thing that I learned… having a one year old assist with the pinning process pretty much guarantees that the loops WON’T line up!!! I thought I had compensated nicely, but once it was all sewn, I realized that two of my loops were partly unattached. Ahhhhhh!! So… if you try to do this yourself, pay attention! Or get a babysitter!
I stitched it together, very close to the edge. (Gotta love my measurements, right?) I used a stitch I hadn’t tried before and thought might be a little stronger for the loops. I didn’t want stress or fraying. I probably could have used something stronger, but I rarely stray from the straight stitch. One day I’ll learn how to really use my machine.
Once I was finished sewing, I put my hand through the whole thing and then pulled it right-side out.
This is the point where I should have taken a great photo… but I was too busy panicking about the fact that a few of my loops hadn’t been sewn in properly, and then re-securing them awkwardly and whatnot.
Do it right if you do it. Make sure you are all lined up. Double check as you go. Waste not want not… and all that.
Then, I folded in the ends just a tad and sewed a little seam to finish them up.
I think the top turned out nicely. Certainly nicer than I had thought they would on my first, barely measured, toddler assisted attempt at curtains.
Then, I took two pipe cleaners. I almost lost you just now, didn’t I? Follow along. I stuck a pipe cleaner through a little hole in the mounting hardware of our blinds and twisted it to attach. I did that on both sides. Then, I held up the rod, with the top part of the curtains on it, and wrapped the other end of the pipecleaner around the rod and twisted it to secure there too. That way, I could get a look at it near a window without pretending I can judge my work while I’m holding it.
I pinned up the fabric that I was going to use for the bottom and took photos…. blinds open, blinds closed…
So far, I thought they looked pretty cool! I had originally planned to use some of the gorgeous, pink lacey fabric that hubby had brought me as a top layer… but I wasn’t sold after I pinned that up too….
So… that is where I left off. I unpinned everything and emailed hubby for input.
He agree that the pink was a little overwhelming. We both preferred the look of the fabric plain. After nap, we’ll take a fabric break and do some housecleaning (company coming this week!) and I’ll sand and stain the rod. Some Danish Oil ought to do the trick. And maybe, just maybe, I’ll get the curtain done before bed time. I won’t be able to mount it properly… I haven’t figured out the mounting plan yet… but maybe I can figure something out. I can always just tie it to the blinds hardware… should at least help with the light. I’ll update as I get more done!


You May Also Like
Letter Review
Ana White : Homemaker & The Modern X Picnic Table!